Agent Features
ChipMonk has many features and settings to make it as useful as possible!
Chat Controls
Type your message in the input area at the bottom and press Enter to send. Use Shift+Enter for a new line.
The agent responds with streaming text — you'll see the response appear token by token. While the agent is working, you can:
- Press Escape or click the stop button to cancel
- Type a new message and press Enter to interrupt and redirect
Model and Effort
Next to the input area, a picker lets you choose the model and reasoning effort:
- Model: Haiku 4.5 (fast, light), Sonnet 4.6 (default, balanced), or Opus 4.6 (most capable)
- Effort: Low, Medium, or High (default) — controls how much reasoning the model does per response
Lower model and effort settings are faster and use fewer tokens.
Sessions & History
Your conversations persist across VS Code sessions.
Context Window
A bar at the bottom of the chat shows how much of the conversation context is used. Long conversations gradually fill this up; start a new session when it gets high.
Multiple conversations
You can have multiple agent tabs open at the same time, each running an independent conversation. Click the wand button or New Chat to start another one. The status bar shows how many sessions are active - for example, GF+ Agent (2 running) - and flags any that need your attention.
Use Cmd+Shift+A (Windows/Linux: Ctrl+Shift+A) to open a quick-pick list of all sessions and jump between them.
Browsing past sessions
Switch to the Sessions tab to see all conversations, grouped into active, recent (last 24 hours), and older. Each entry shows a status dot, the conversation title, and the message count.
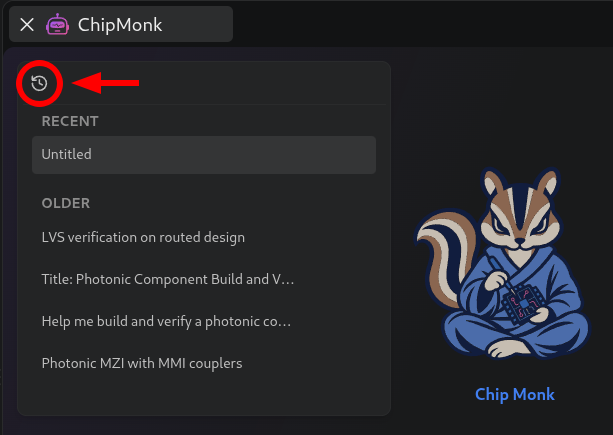
Click a session to resume it. Click the trash icon to delete it.
All conversation data is stored locally on your machine.
Safety & Confirmations
The agent asks for your permission before taking any action that modifies your environment.
Auto-allowed (no confirmation needed)
- Reading files, logs, and status
- Running diagnostics
- Opening UI panels and viewers
- Loading modes and workflows
Requires confirmation
When the agent needs to do something that changes your system, you'll see a confirmation prompt:
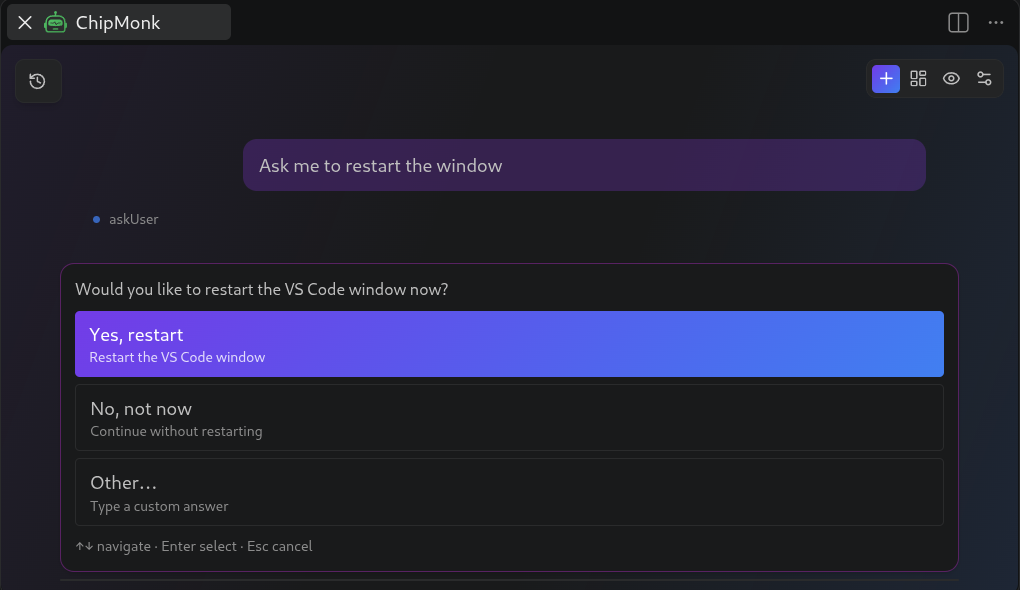
Examples of actions that require confirmation:
- Creating or editing files
- Restarting the backend or legacy watcher integration
- Installing packages
- Downloading sample projects
You can choose:
- Allow - approve this specific action
- Deny - reject and let the agent try a different approach
- Allow All - auto-approve similar actions for the rest of this session
Allow All tracks file writes and shell commands separately - approving all file writes does not also approve shell commands, and vice versa. When active, a yellow banner appears at the top of the chat with a Revoke button to turn it off.
Always blocked
Some actions are never allowed, even with Allow All active:
- Running commands as root (
sudo,doas) - Destructive file operations (
rm -rf) - Pushing to git remotes
- Network requests to external URLs
Custom Instructions
You can set custom instructions for ChipMonk in the settings. This allows you to customize the way the agent speaks, how it formats responses, and more!
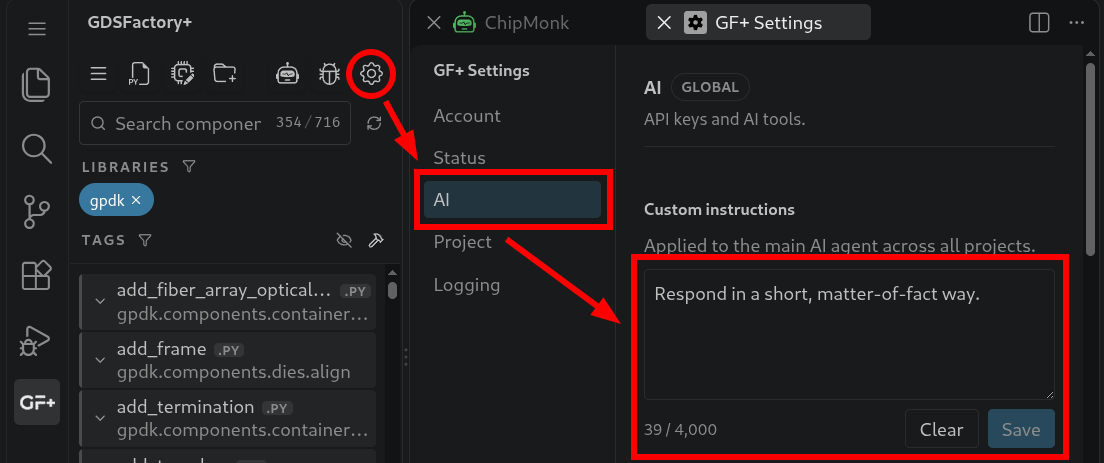
SupportMonk
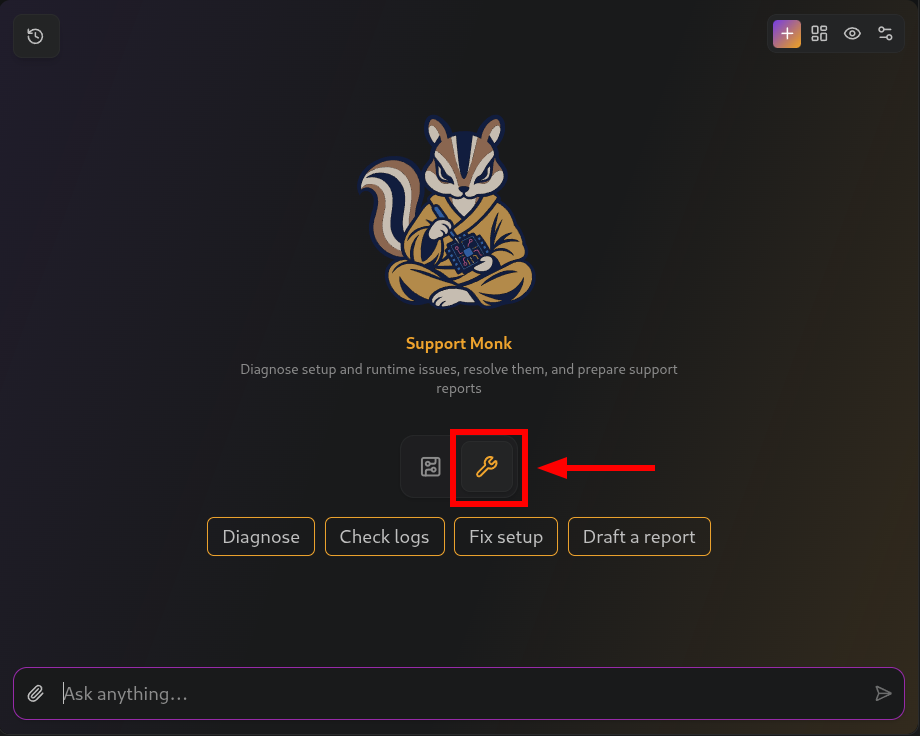
You can click the 🔧 icon in the ChipMonk startup screen to switch to SupportMonk.
In this mode, the agent can diagnose and address problems with the GDSFactory+ extension itself. It can solve issues with the extension's environment, configuration, dependencies, etc.
Using the MCP Server with Other AI Assistants
The built-in agent is not the only way to use AI with GDSFactory+. The gfp-mcp package is a standalone Model Context Protocol server that connects any MCP-compatible AI assistant to your running GDSFactory+ projects. This includes tools like Claude Code, Claude Desktop, and Cursor.
The MCP server provides the same core design tools - building cells, exploring the PDK, running verification checks, and simulating components - but through your AI assistant of choice.
Installation
The MCP server auto-discovers running GDSFactory+ projects, so there is no project-specific configuration needed. Just install it in your preferred AI assistant:
Claude Code:
Cursor (in .cursor/mcp.json):
{
    "mcpServers": {
        "gdsfactoryplus": {
            "command": "uvx",
            "args": ["--from", "gfp-mcp", "gfp-mcp-serve"]
        }
    }
}
Claude Desktop (in claude_desktop_config.json):
{
    "mcpServers": {
        "gdsfactoryplus": {
            "command": "uvx",
            "args": ["--from", "gfp-mcp", "gfp-mcp-serve"]
        }
    }
}
Available Tools
| Tool | Description |
|---|---|
list_projects |
Discover all running GDSFactory+ projects |
get_project_info |
Get project metadata (PDK, path, version) |
build_cells |
Build one or more GDS cells with optional PNG visualization |
list_cells |
List all available components in the PDK |
get_cell_info |
Get component details (ports, settings, source) |
check_drc |
Run Design Rule Check |
check_connectivity |
Verify port connections |
check_lvs |
Layout vs. Schematic verification |
simulate_component |
Run SAX circuit simulations with optional plots |
list_samples |
Browse sample files from GDSFactory+ projects |
get_sample_file |
Read sample file content for reference |
Note
The MCP server requires a running GDSFactory+ project (started via the VS Code extension). It discovers projects automatically through the server registry.